Want to harness the power of Shopify SEO to get tons of paying customers to your store?
With the 5 steps in this guide, you’ll learn how to optimize the SEO of your e-commerce store to start driving tons of relevant, free organic traffic to it!
In this guide, you’ll learn how to:
- 1. Optimize Your Site Structure with Shopify Collections
- 2. Write SEO Optimized Collection Descriptions that Sell
- 3. Perfect Your Shopify Product Pages
- 4. Blog to Get More Business to Your Shopify Store
- 5. Leverage Link Building for Shopify
Ready to make your store way more profitable with Shopify SEO?
Let’s get into it!
Why Do Shopify SEO?
Online shopping is growing at a breakneck pace with no signs of stopping:
40% of internet users in the United States make online purchases several times per month. 20% of U.S. internet users bought goods or services online weekly.
With the majority of this online shopping revenue going to Amazon and Walmart, SEO is more important than ever if you want to get your Shopify store discovered and compete with these behemoths.
You already know that you can get traffic to your eCommerce site by optimizing it for eCommerce SEO.
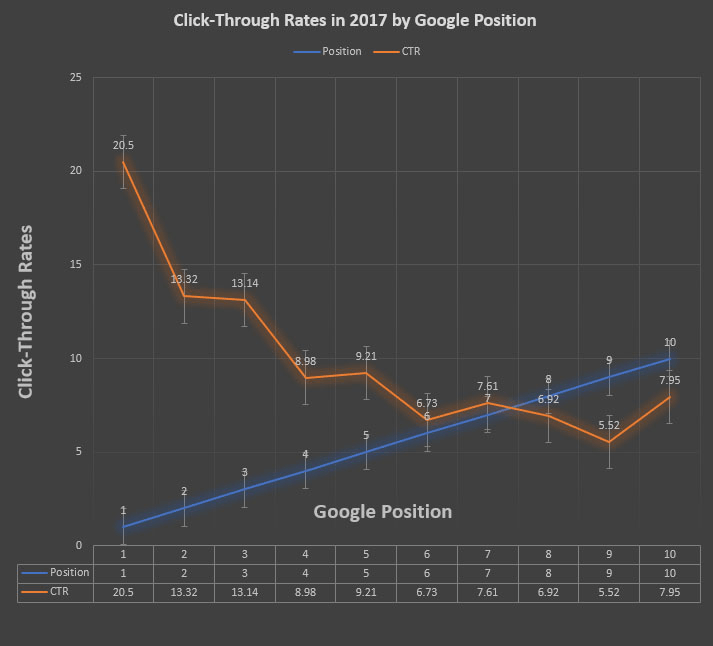
The latest data confirms that the top organic positions on Google still drive the majority of traffic for a given search.
With all that in mind: SEO is a proven method for getting recurring traffic to Shopify sites.
How? By taking advantage of the advanced SEO tools that Shopify provides: mobile responsive themes, built-in testing, and easy metadata editing.
Shopify has built-in SEO features to make it easier to manage your store. They automatically generate your website’s robots.txt files and sitemap.xml. On top of that, themes generate title tags featuring your store name.
Here’s the step-by-step SEO guide to learn how to drive more traffic to your store with SEO tips for Shopify.
Step 1: Set Up The Perfect Site Structure With Shopify Collections
Site architecture, otherwise known as site structure, is a critical component of Shopify SEO.
It involves everything from better internal linking, to increased organic search, to an easier user experience that keeps people coming back for more.
Shopify Collections are navigation elements on your Shopify store that help users find your products by grouping products into collections/categories:
These categories could be anything from sale items, to men’s jeans, to clothing for women, etc.
Similar products can be grouped into a collection that makes it easy for potential customers to find what they’re looking for.
For instance, you can group your products into a few collections (“Men’s,” “Womens,” “Brands”) to funnel traffic into the right spot without a user having to explore their entire catalog.
You can always add more collections, they just need to make sense as the overarching categories for your range of products.
Hub pages are essentially collection pages on a given topic that internally link to multiple pages related to the original topic. It’s like a table of contents for your store.
The principle of being a “hub” works for this news article because they provided a central starting point for people interested in the World Cup to keep up on the latest news.
It will work for your store if you strive to be the hub for what your customers want. Your store’s collections provide this hub-like structure.
Depending on your product offering amount and spectrum of markets (men, women, children, etc.), your collections should start from simple categorizations and dive deeper once those are selected.
For example, when clicking on the women’s offering of Good As Gold, collections are broken down further into more specific categories:
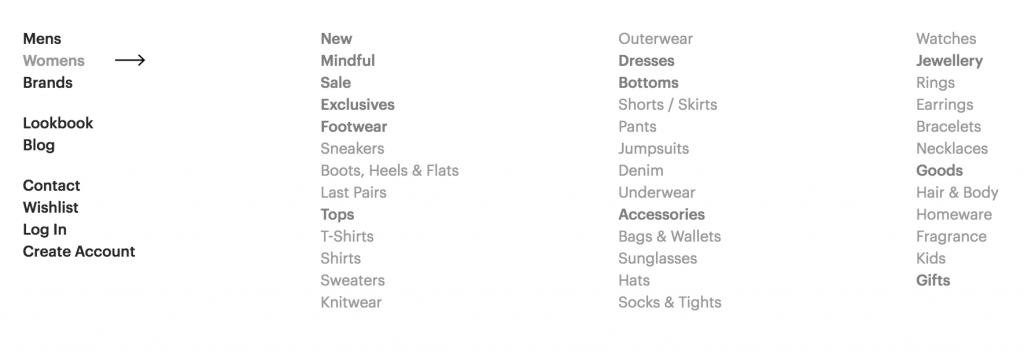
Including these sub-categories of footwear, tops, dresses, etc. without the primary collection of “Women” would overwhelm users.
Starting small with generalized collections will help draw users in. The sub-categories guide them toward the actual product they want.
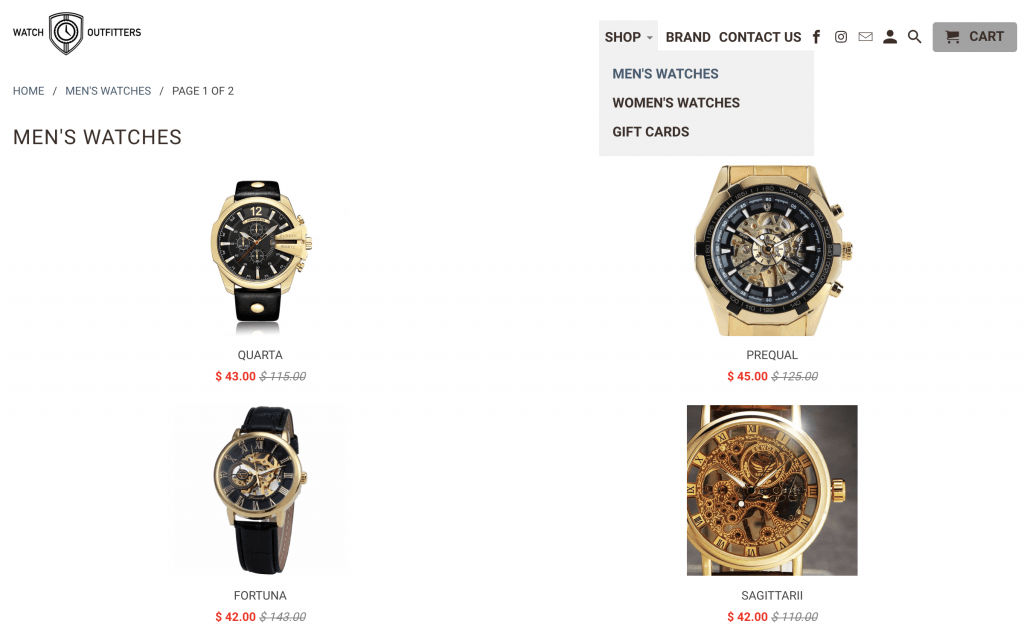
Watch Outfitters uses a similar content marketing strategy, simplifying its structure to make the experience as easy as possible:
Decision fatigue will kill your conversions! Make it easy for your customers to choose what they want by simplifying your shop’s structure in the collections section of your Shopify dashboard.
To set up your product collections, follow these steps:
Decision fatigue will kill your conversions! Make it easy for your customers to choose what they want by simplifying your shop’s structure in the collections section of your Shopify dashboard.
To set up your product collections, follow these steps:
1. Navigate to “Collections” page under Products in your Shopify admin.
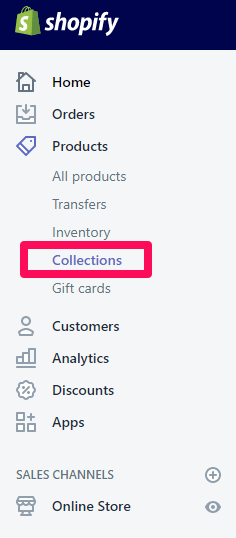
2. Click “Create Collection” to set up either an automated or manual collection.
You’ll arrive at this page, where you can set up all aspects of your collection.
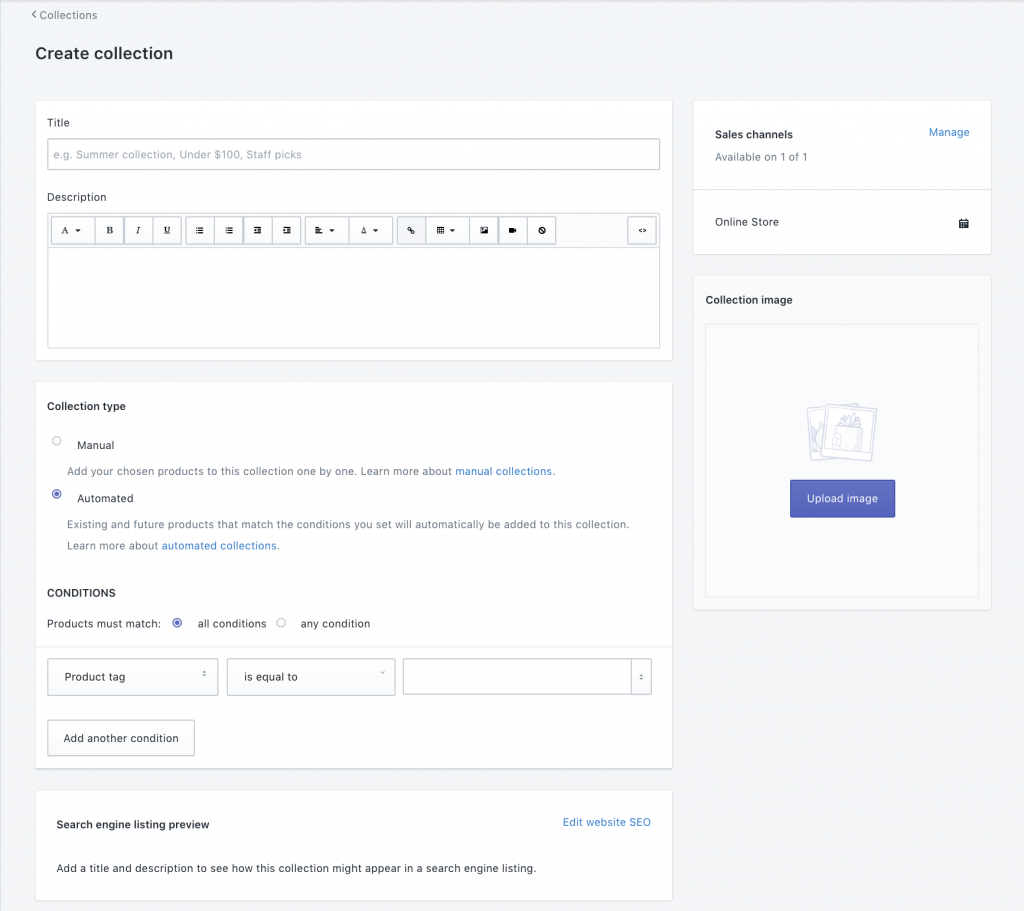
In the “Collection type” section, click manual or automated.
As its name suggests: an automated collection allows you to save time by having the Shopify app add products automatically to collections that pertain to them.
Stores with a lot of different stock can take advantage of automated collections to help streamline the process of adding new products.
Manual collections are a better choice for small or personally curated collections.
For example, you can put items that are part of a special one-time discount or other promotion into a manual collection to make sure the discount applies only to products in that collection.
Keep in mind that once you make an automated or manual collection, you can’t go back and change it to the other type.
Here is the proper way to set up each type of collection:
3. Automated Collections
Once you set up an automated collection, associating conditions with that collection will cause products containing those conditions to automatically get placed in it.
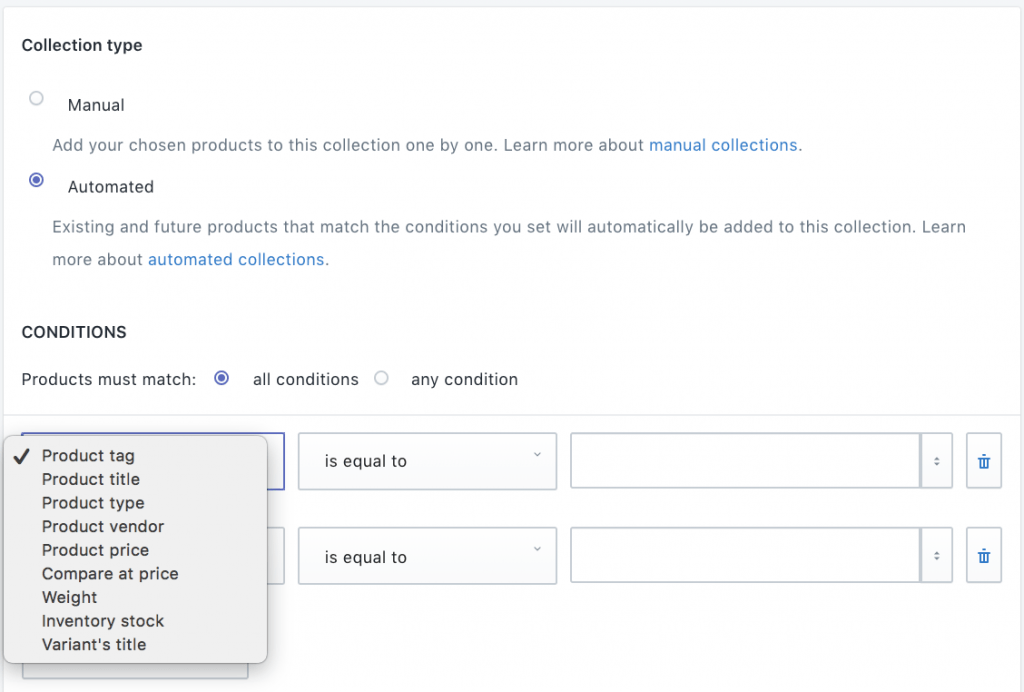
Product conditions are essentially just “tags” associated with the product, such as color, length, the season of wear, etc. You can determine the condition in any way you want.
As you can see in the screenshot, there is a general “product tag” to allow you to choose anything as the condition. Or you can use the other pre-loaded conditions in the drop-down that would be relevant for your stock of goods:
The other drop-down with “is equal to” as the default allows you to set a secondary guideline for automatically grouped products:

The combination you choose will depend on your variety of goods and how you’d like them to be grouped together.
Once you’ve got the conditions set up, future products can be automatically added to the right collection when tagging conditions on the products.
The one thing about automated collections is that in order for them to be “automatic” you have to make sure to edit a product’s details to match those conditions.
Likewise, you need to remove those conditions from the product if you want it removed from the collection.
4. Manual Collections
As you might guess, a manual collection includes only individual products that you select to add to it.
Once you’ve clicked “Manual” as the collection type, click save.
In the Products section, click on “Add products” to designate which products you want in that collection.
Here is another video tutorial from Shopify, this time walking you through how to set up a Manual collection:
5. Once you’ve set up either a manual or automatic collection:
- Set the sort order for how you want your products to appear. Click the drop-down list next to “Sort” and pick a sort order. It can be manually ordered or sorted by best selling, product title, highest/lowest price, or newest and oldest products.
- Go to the “Sales Channels” section and choose which active sales channel you want the collection to be available in.
- Upload an image to the Collection image section.
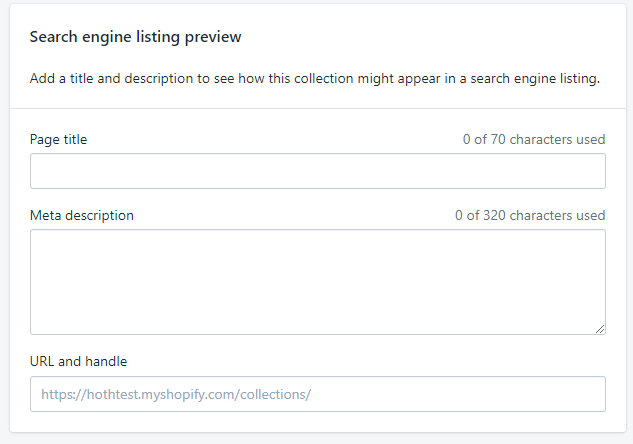
- Check the Search engine listing preview to see how the collection will be displayed in the search engine results. If it could look better, click “Edit website SEO” to change the way it will appear.
Note that Shopify does not let you edit the URL and handle because they are part of your store’s URL structure.
Finally, be sure to add a link to the collection you just made in your store’s navigation menu. To do this:
- From your Shopify admin, click Online Store > Navigation > Menu > Menu items > Add menu item.
- Enter the collection name as you’d like it to display to customers in the “Name” field.
- Go to the Link list and select “Collection”, then select the collection that you’re adding a link for.
- Click “Add”
- Click “Save menu”
And you’re done! While this may seem like a fair number of steps, it’s really not that bad and can be done in a matter of minutes if you know what you’re inputting.
Remember, taking the time to set up your collections can really help to organize your store and ensure a great user experience for any shoppers who come across it.
Step 2: Use Shopify SEO Apps
Digital marketing using Shopify can be confusing if you’re unacquainted with code or templates. To make things easier for store owners, Shopify offers paid Apps that can assist you in modifying your site without adjusting the code manually. These are similar to WordPress plugins in functionality.
Here are some useful Shopify apps for improving SEO:
- Schema App Total Schema Markup: This is an app used for site managers to add custom structured data to your Shopify store. You can use it to get rich snippets.
- Smart SEO: This app automatically generates alt tags, meta tags, fixes broken links, and helps you manage your Shopify store’s sitemap.
- SEO Manager: Recommended as an all-around great Shopify tool to increase your store rankings. It allows you to create keywords, descriptions, titles, meta tags, and feedback on how each of these is performing on your site.
- Image Optimizer: This tool provides you with SEO image optimization by setting the alt text automatically, compressing current and new images and files to reduce file size.
Step 3: Understand Unique Shopify SEO Adjustments
Duplicate content
Duplicate content in Shopify happens when there’s similar content existing in two separate URLs, causing an issue for search engines as they won’t be able to determine which is the canonical version of two pages.
To better understand this, try to search the category page on a Shopify site. This will display the product listings and a list of links associated with the category page. Click on any of these pages and you’ll be redirected to a product page with the collections & products in the URL path.
When you observe the canonical tag of this page, however, you’ll find that the tag is referencing a different URL, presenting you with a duplicate of the original page listing.
In other words, every product page that’s listed on your website’s category pages is classified as duplicate content.
Duplicate content harms your site structure and prevents your URLs from ranking on Google.
You can fix this by adjusting your Shopify theme files and adjusting the code on all of your category pages.
Set up Google Search Console
After spending so much time setting up your Shopify store to look the very best, you wouldn’t want your shop to be invisible to search engines.
There are two files that provide search engine bots with the information they require to be indexed and crawled. These are the robots.txt file and the XML sitemap.
The robots.txt file is a text file found in the root directory of your Shopify website, and it provides search engine bots the information of what pages to crawl and not to crawl. This is crucial for ranking, as without this file being available, your site won’t rank.
On the other hand, the XML sitemap file contains the list of all available web pages on your site and their metadata. To locate your sitemap URL, type in the following URL into a search engine browser, replacing ‘example’ with the name of your domain: http://www.example.com/sitemap.xml.
If you find the sitemap, then that means it’s available there. If not, then you’ll most likely receive a 404 error.
Should you get the error, then you can generate the sitemap yourself.
The process for the robots.txt file is the same. This time, you can type in: http://www.example.com/robots.txt, where once again ‘example’ is your domain name.
Once you have both files ready, set up a Google Search Console by creating a Google Webmaster account.
The next step is to submit your site to Google Search Console so that it can be indexed.
To do this, submit the automatically generated sitemap file to Google through your Google Webmaster account.
Google Webmaster tools can help you identify any crawling errors. Search engines index websites using bots that crawl a website and its pages, and a crawling error happens when a bot tries to reach a specific site but fails.
After setting up Google Search Console, you should also create a Bing Webmaster Tools account to show up in the search engine. You can create a free account by registering on their sign-up page and repeating the process for the Google Webmaster account.
Step 3: Write SEO-Optimized Collection Descriptions that Sell
At this point, I’m probably hitting you on the head with this: but user experience really matters if you want to maximize your sales and increase search volume.
So: write long and useful descriptions for your collections page rather than just letting the products speak for themselves.
100% Pure masters this tactic with beautiful customer-focused descriptions in their Shopify collections.
Here’s the description for their “Face Makeup” collection:
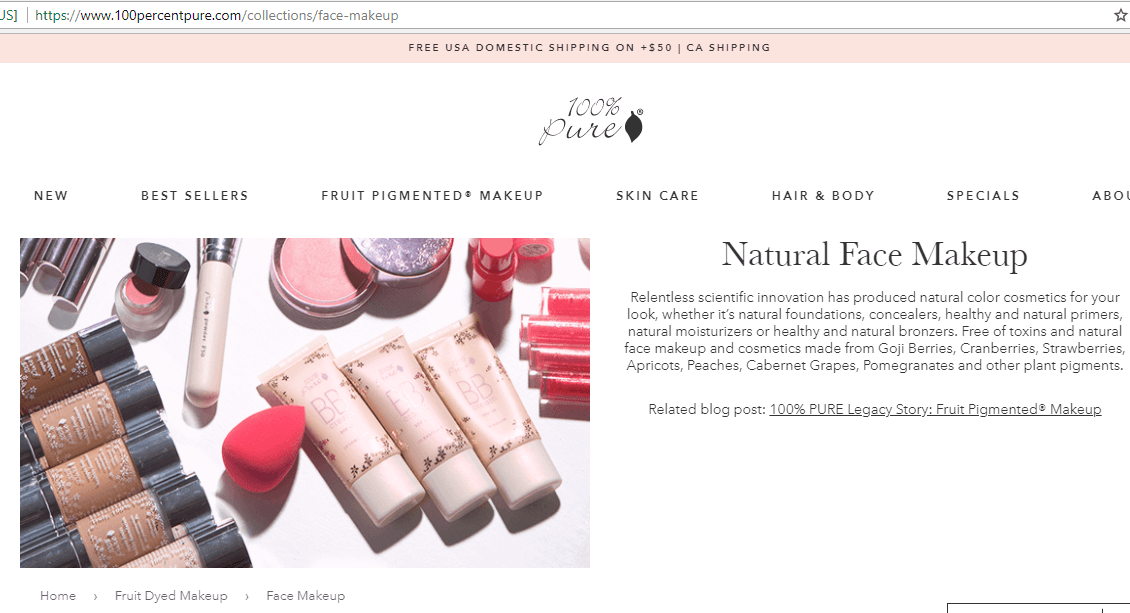
For each collection, like “Face Makeup,” they write a solid description explaining that particular product collection and what you can expect from it.
This has a dual use for user experience and SEO.
The description helps that page to appear relevant both for customers looking at it and for the keywords that it’s trying to rank for. In this case, the keyword is “natural face makeup.”
Internal links are another important component of on-page SEO for your Shopify store. To this end, 100 Percent Pure also links out to a related blog post on their collections page to keep people interested and learning more.
Doing internal linking like this is a great way to increase SEO strength, relevance and to keep users on-site longer.
Shopify’s platform provides spaces for optimizing various components of on-page SEO. So in your collections, be sure to edit the meta description, title and URL as well:
Optimize your site structure by keeping it simple. Remember that social media links don’t count towards your page ranking.
Group alike products into collections and use those collections as a chance to write engaging content, produce internal links and improve on-site navigation.
Step 4: Optimize Your Shopify Product Pages
So your collections are made and you’ve just put up some new products on your Shopify store.
You added some wonderful images, descriptions, videos, alt text, and HTML titles for each product, right?
But how do you optimize your products for SEO? Are there more steps you can take other than a good image and description? Does it really even matter?
It absolutely does! Especially with Shopify’s SEO-friendly features.
Let’s get into the mindset behind how great product descriptions drive sales:
The Nielsen Norman Group conducted a major study on e-commerce user experiences, finding that 20% of failures to complete a purchase were due to bad product descriptions.
Here is what they said regarding the effect of bad product descriptions:
“Leaving shoppers’ questions unanswered can derail a sale or even worse, make shoppers abandon not just the purchase, but the site as well.”
As you can see, product descriptions are important to keep people’s attention. Not only that, product descriptions are one of the greatest ways to communicate everything about the product.
Product description pages:
- Answer questions.
- Address pain points and problems.
- Provide your product as the solution!
Rather than just describing the product and the features it has, you should strive to write product descriptions filled with end-user benefits.
For example, nobody cares if your sunglasses are “made from carbon fiber with a chiseled outer frame.” They care about whether it will survive a drop or being stepped on.
A perfect example of this is Sperry Top-Sider. Looking at each product, they give thorough product descriptions and even detailed graphics explaining not just the product features but the direct benefits those features provide:

Rather than just mentioning the features, Sperry is spelling out exactly how those features improve your experience while wearing the shoes by telling you what benefits you can expect. (Such as comfort and durability.)
“Minimal pattern allows less piercing, which means more comfort against your foot.”
The minimal pattern is the feature. More comfort is the benefit.
“Genuine handsewn moccasin construction helps to provide stability, comfort and superior fit.”
Being genuine handsewn moccasins is the feature. Stability, comfort, and superior fit are the benefits.
On top of a benefit-focused description, you should get to the point ASAP. Don’t write product descriptions for the sake of filling out text for search engines rankings.
While content helps improve search engine rankings, content for the sake of length might cause SEO issues.
You don’t want users to get distracted or overwhelmed, leading to a bounce and no sale.
Keep it short, sweet, and to the point. Bad user experiences are a recipe for disaster, while good user experience has them adding products to their cart.
For example, look at how simple yet straightforward the product descriptions are for this Shopify-hosted orange juice brand:
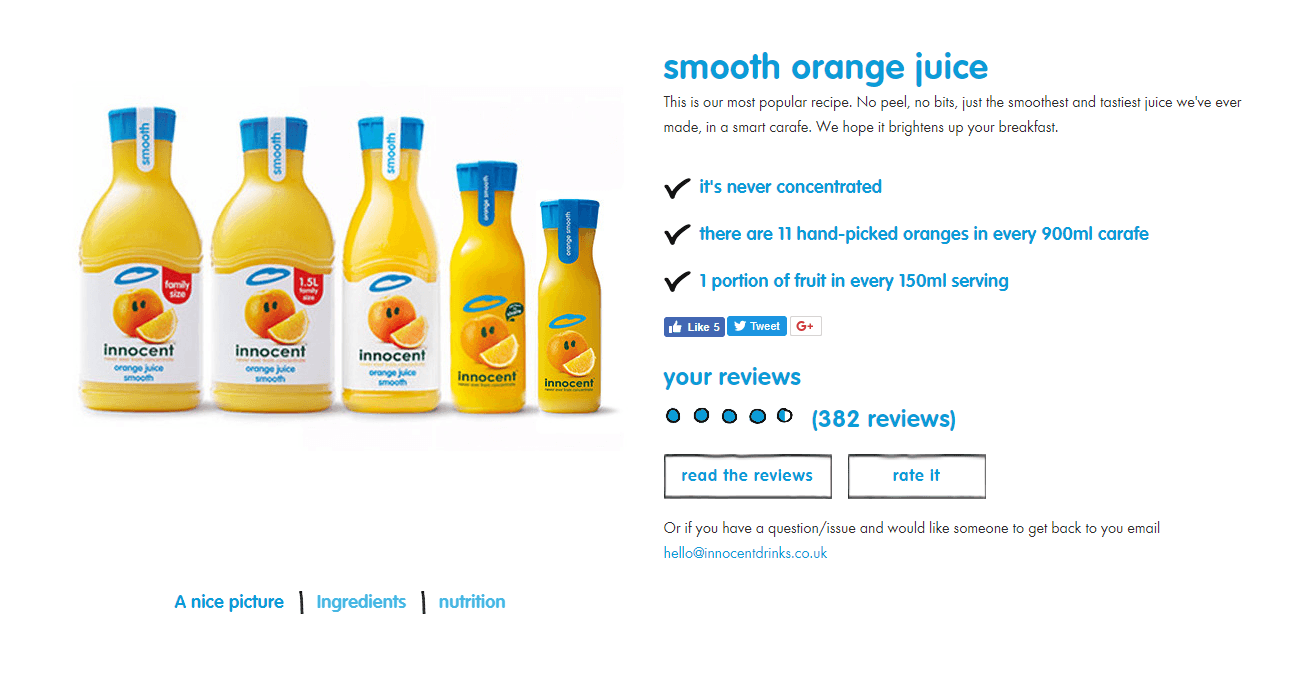
Using black checkmarks, the focus is immediately drawn to what a customer would actually care about:
“Never concentrated, 11 oranges per bottle, one serving of fruit.” The things people really want to know.
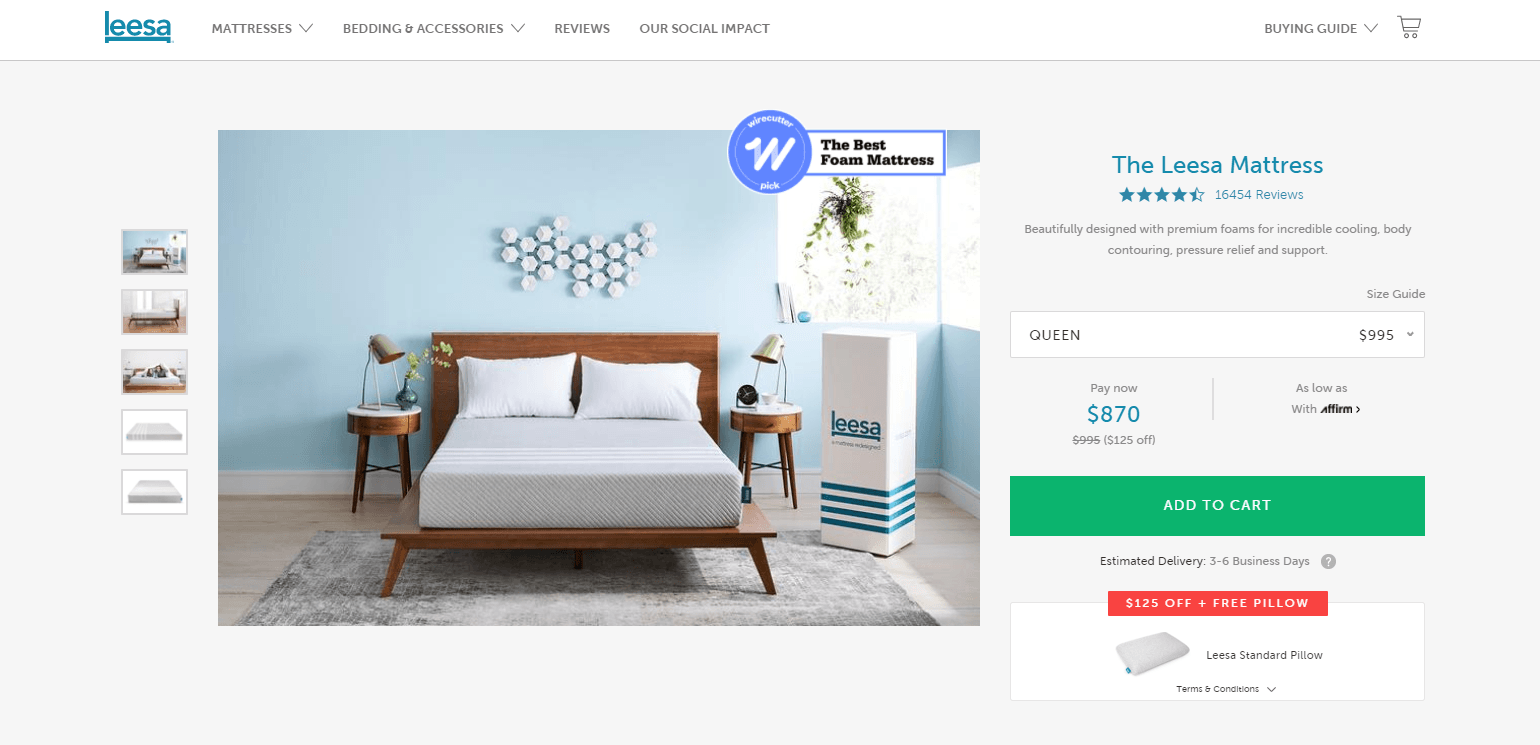
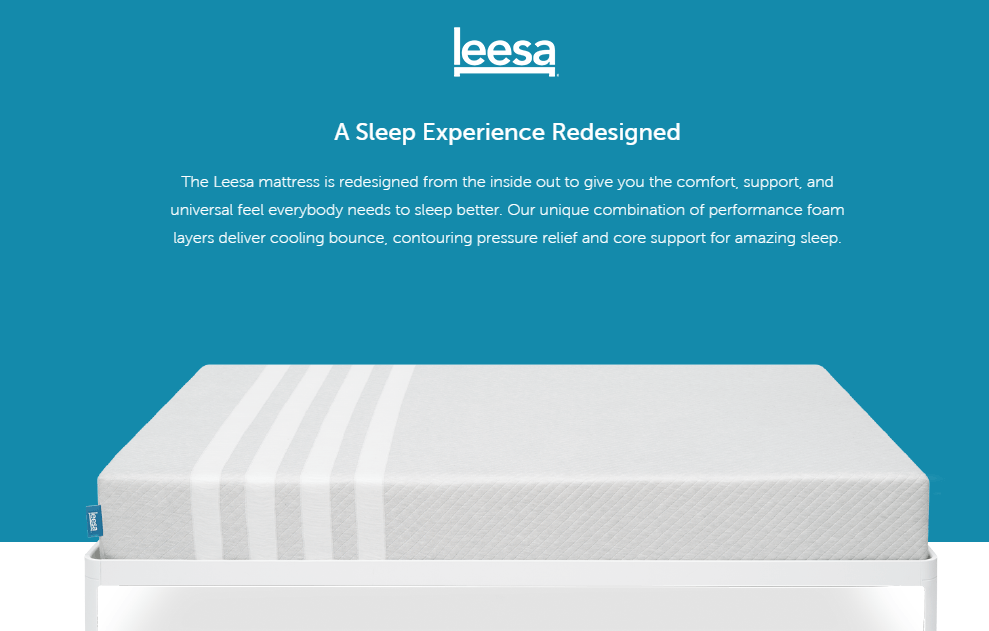
Shopify merchant Leesa optimizes their product page with high-quality long-form content, structuring it so that they don’t overwhelm users or bore them if they don’t want to read about the product.
This works to provide context and content for SEO and solve user problems.
Landing on their product pages, you will first see their product images and a small description:
If you want more information, scrolling below the fold showcases a detailed description:
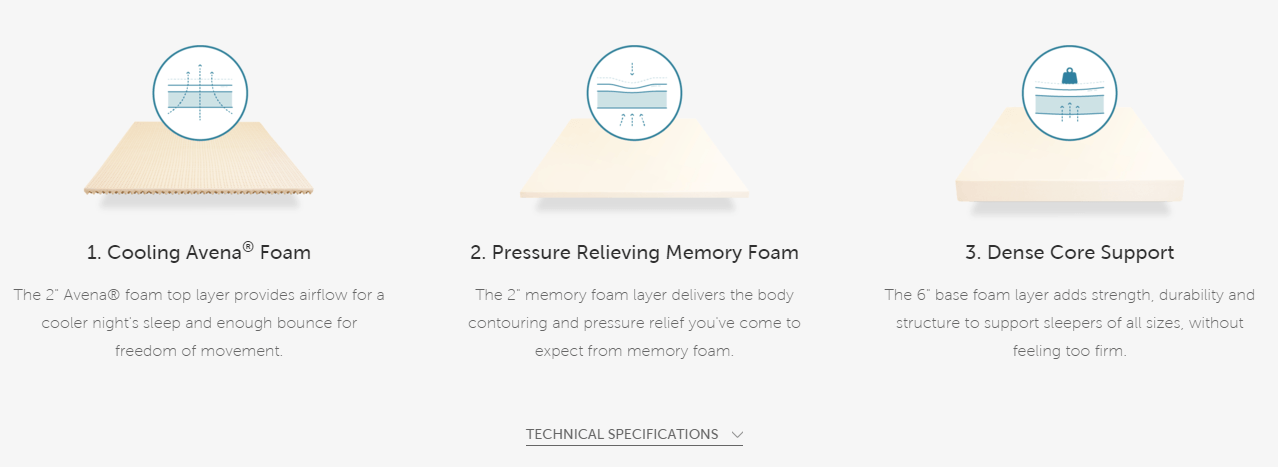
Each factor of the product is broken down into multiple related topics that searchers are looking for. From memory foam to support and technical specifications:
With these best practices in mind, you can head over to your products dashboard on Shopify and start to craft optimized descriptions that will improve time on site and conversions.
1. Select Your Products
First, click on “All products” in your Shopify admin: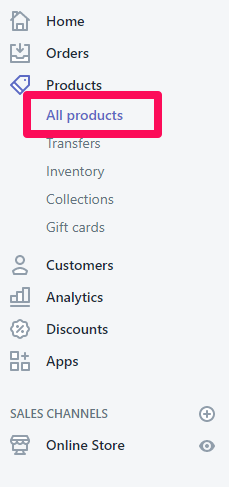
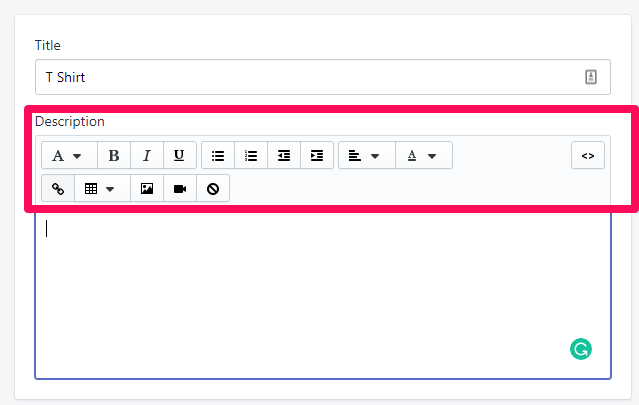
2. Add your descriptions
Keep benefits in mind before features. While editing product descriptions, you can use preset, diverse customization options or even enter your own coding:
A few other things to keep in mind when writing product descriptions:
Take advantage of bullet points, checklists, and ways to simplify information for online readers. People skim, and it’s crucial to cater to their reading patterns.
Additionally, when writing descriptions, try to layer in LSI keywords to add context and relevance. Using the LSI Graph, you can enter your product name or general product type to generate a list of related keywords to enhance your on-page SEO. Remember to monitor your keywords’ performance metrics in Google Analytics.

To come up with higher ranking keywords that increase click-through rates, you can use a keyword research tool like the Ahrefs keyword generator.
See our guide on keyword research to obtain more ideas on how to increase your conversion rate by expanding your Shopify keyword list.
3. Optimize your title and meta tags
After writing a great product description with your keywords and LSI keywords, it’s time to optimize your meta descriptions and titles for search engines again.
Why? Because if you don’t, Google will pull information from your page to fill it, resulting in copy that doesn’t compel someone to click.
People will look at the description in Google before even clicking on your website, so check out how the Search engine listing preview looks:
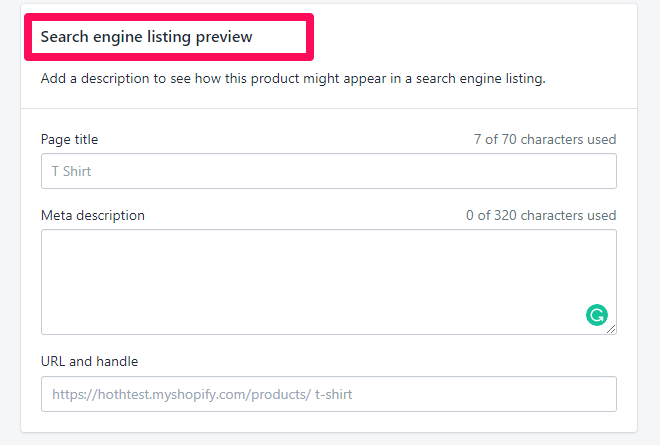
Remember: keep the title and URL simple, including your product name/keyword. Meta descriptions should be enticing and loaded with click-inducing benefits.

For instance, take a look at that example meta description from Tactics online skate shop. Their title directly matches my keyword search of “Skate shoes,” and their description is loaded with reasons to click:
- Fast and free shipping
- No sales tax
- Leading brands to choose from
Are you currently running a promotion on your Shopify store?
Enhance your CTR by sharing your sale information right in the meta description.

Fill your descriptions with benefits, sales and any other reasons for someone to click your product instead of on the competition’s product.
The Power Of Video
While product descriptions play a very important role, one additional way to make your product pages even more engaging is to incorporate video. Using video is one of the best ways to improve your users’ experience on your site.
For consumers, one of the biggest risks of shopping online is the possibility of receiving a product that does not accurately resemble the product description and images shown on the website.
Product videos completely eliminate this problem by giving an in-depth look at your product. These videos provide a 360° view of your product while also highlighting all of the features that make it unique.
By presenting your products in a video format, consumers are nearly twice as likely to purchase after watching!
Here are some other reasons to consider adding product videos to your e-commerce website:
- Customers will spend approximately 88% more time on a website with video content. More time on your website equates to higher Google rankings and an increased likelihood of making sales.
- Your customers are asking for it! According to a study from Animoto, 84% of consumers want to see MORE product videos on Amazon and other e-commerce platforms!
Step 4: Add a Blog on Shopify (And Why You Need One)
When it comes to your SEO strategy, tagging and optimizing products and pages on your site is the first step.
But that’s not going to be enough to bring in traffic from multiple funnel stages.
You can’t rely on products to drive all of your traffic. Especially not in such a competitive landscape.
Specific, product-based search terms indicate that users are very deep in the buyer’s journey. Here are the basic stages of the buyer’s journey:
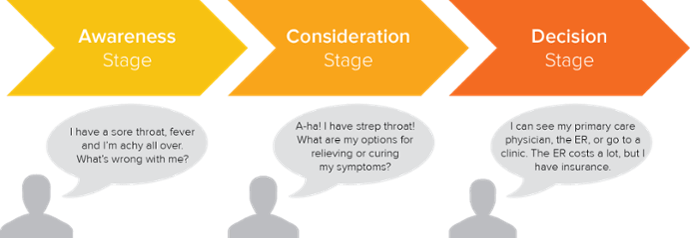
During the awareness or early stages of problem realization, users aren’t searching for products just yet. At least not specific or even branded ones. Instead, they are likely looking for more information.
For instance, someone early in the buyer’s journey might be searching for “best TVs of 2018” to review multiple products:
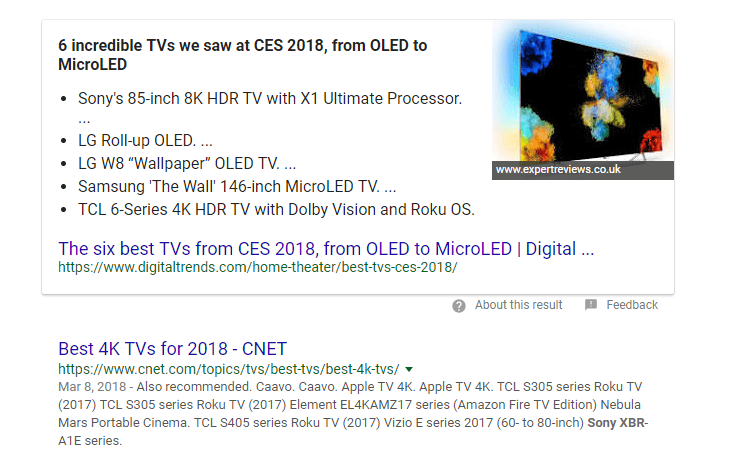
They are likely still comparing, rather than searching for “60 inch HDTV.”
Meaning your product page optimization can only bring in so much traffic.
And you can’t always bank on bottom-of-the-funnel traffic to convert on a dime or their first visit.
Something to remember: 98% of people don’t convert on their first visit. So how will you get them the next time around?
You might get a few people to convert here and there on direct product pages, but warming up your traffic with content can help build brand awareness in your space and drive more traffic.
E-commerce is brutally competitive, and you need content to drive visits from non-brand-aware users.
If people don’t know your brand, the likelihood of finding you is significantly lower.
So, what is the best way to drive more organic traffic to your Shopify store?
By adding a blog!
There are a lot of mid-buyer cycle topics that people want to know about (and are searching for!) including:
- Questions about your products (How does X work?)
- Product comparisons (Which is better: Product A vs Product B)
- How To Type Articles (How to make X with this product, how to achieve x result)
- Etc
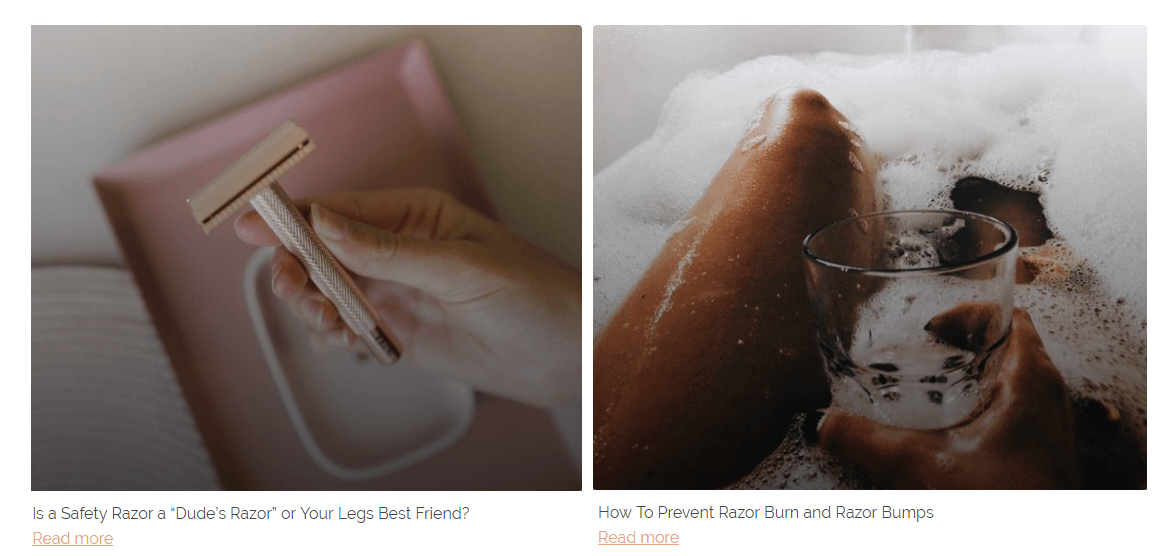
For example, Shopify merchant and shaving company Oui Shave uses blog posts about their safety razor products.
For example:
- “How to prevent razor burn and razor bumps”
- “An epic guide to treating and preventing ingrown hairs”
- “Your razor may be the cause of your ingrown hairs”
All these articles support what they sell, and attract their target customer.
Oui Shave themselves said, “It takes 7+ times before they actually build trust in you enough to part with their hard-earned money.”
This is a general principle of advertising that in the context of a blog, translates to building trust through each exposure to your brand through an informative or entertaining blog post.
To adapt to this reality, Oui Shave used their blog to establish themselves as thought leaders in the realm of safety razors for women, producing content on the top problems and pain points in their industry:
While it would seem hard to blog about shaving products for women, they do, and Oui Shave dominates their market (safety razors for women).
Believe it or not, for every B2C product there are content opportunities to bring in searchers:
HubSpot’s blogging frequency benchmarks show that B2C blogging is critical for driving more traffic.
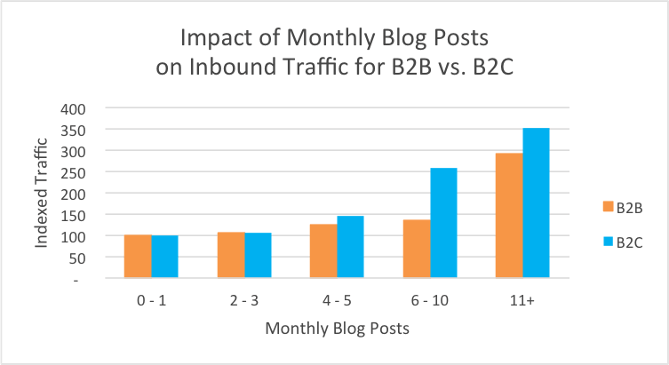
(Image Source)
In fact, blogging 11+ times each month generates more traffic in the B2C space than it does for B2B!
According to HubSpot, “…companies that blogged 11+ times per month had almost 3X more traffic than those blogging 0 – 1 times per month.”
Not only do you drive more traffic with blogging, but companies that blog 11 or more times per month get 4x the amount of leads compared to companies blogging 4-5 times a month.
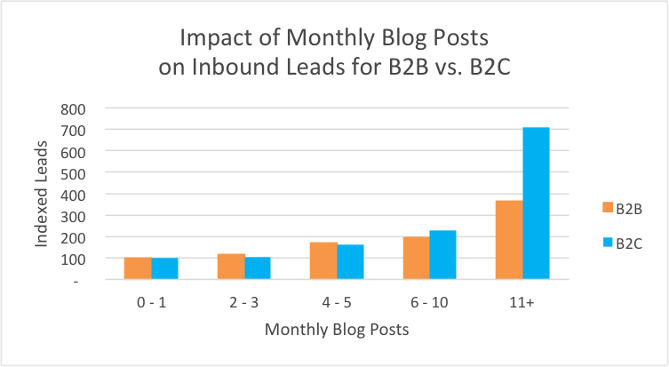
(Image Source)
The key takeaway? More blog posts on your site results in more traffic:
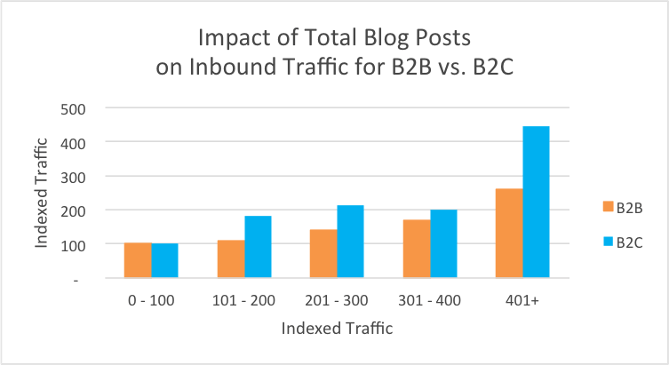
(Image Source)
Why? Because you have more indexed pages covering more diverse topics that cater to different audiences and interests.
This allows you to capture more traffic that can turn into leads and store sales. You’re essentially casting a wider net by pushing more opportunities for your store to be found in search results.
Ready to create some amazing blog posts for your Shopify store to drive more traffic? Here’s how to set up a blog in just a few minutes.
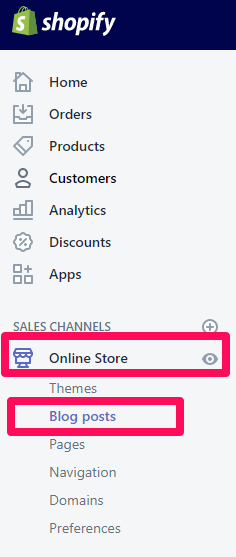
1. Set up Your Blog
First, head to your Shopify store dashboard and click on “Online Store” to pull up more menu options. From here, select “Blog posts.”
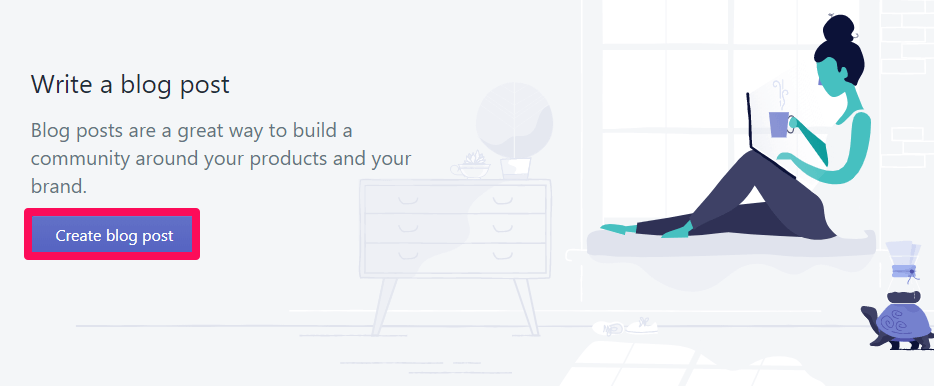
2. Create A Post
Next, select “Create blog post” to start writing and editing your first post:
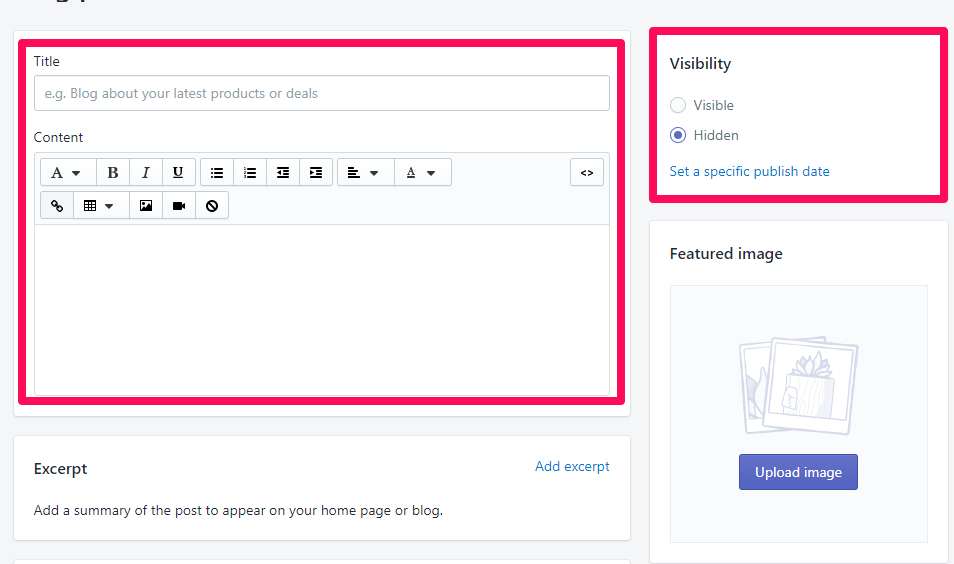
Immediately you can begin to start writing your blog post, crafting a catchy title and setting the publish date:
The most impactful blog posts to increase traffic and rankings are long-form posts. Shoot for at least 1,890 words for each blog post. While this may seem difficult, it allows you to craft blog posts that are all-encompassing.
For topic ideas, let Google auto-suggest do the work:
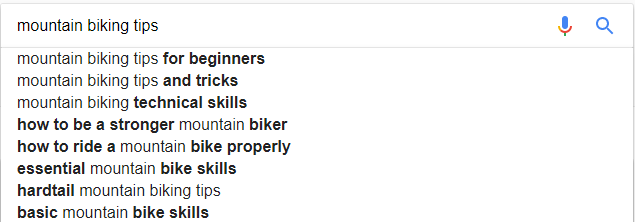
This can help you generate multiple topics that you can include in a single post.
For instance, tips for beginners, technical skills to practice and a how-to section to ride properly.
Those three sub-sections could easily make up 2,000 words on your next post.
After writing your blog post, you can optimize the SEO for it at the bottom of the page:

Want some more ideas for your blog? Check out our post on 50+ blog post ideas.
3. Optimize Your Meta Tags For SEO
Click “Edit website SEO,” and you can craft a compelling title and meta description to drive more clicks from your search engine listings:
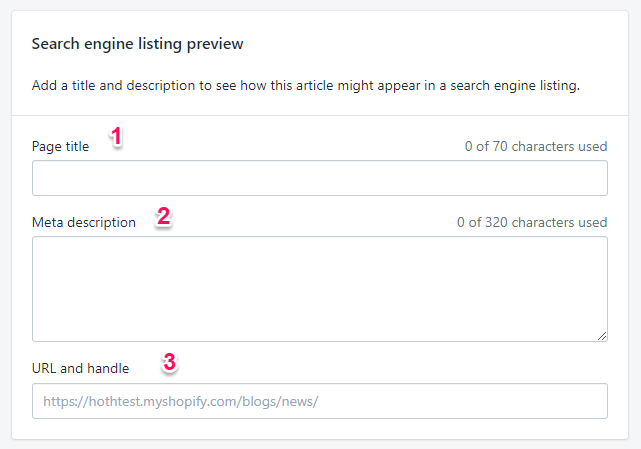
While page titles, meta descriptions, and URLs (permalinks) aren’t direct ranking factors, they can influence CTR which can increase rankings.
Keep your title simple, using the keyword or an LSI keyword to provide context. Repeat that keyword in your meta description, but use the meta description as your chance to convince people to click.
Your URL should be simple and include your keyword. Backlinko found that shorter URL strings rank higher in organic SERPs:
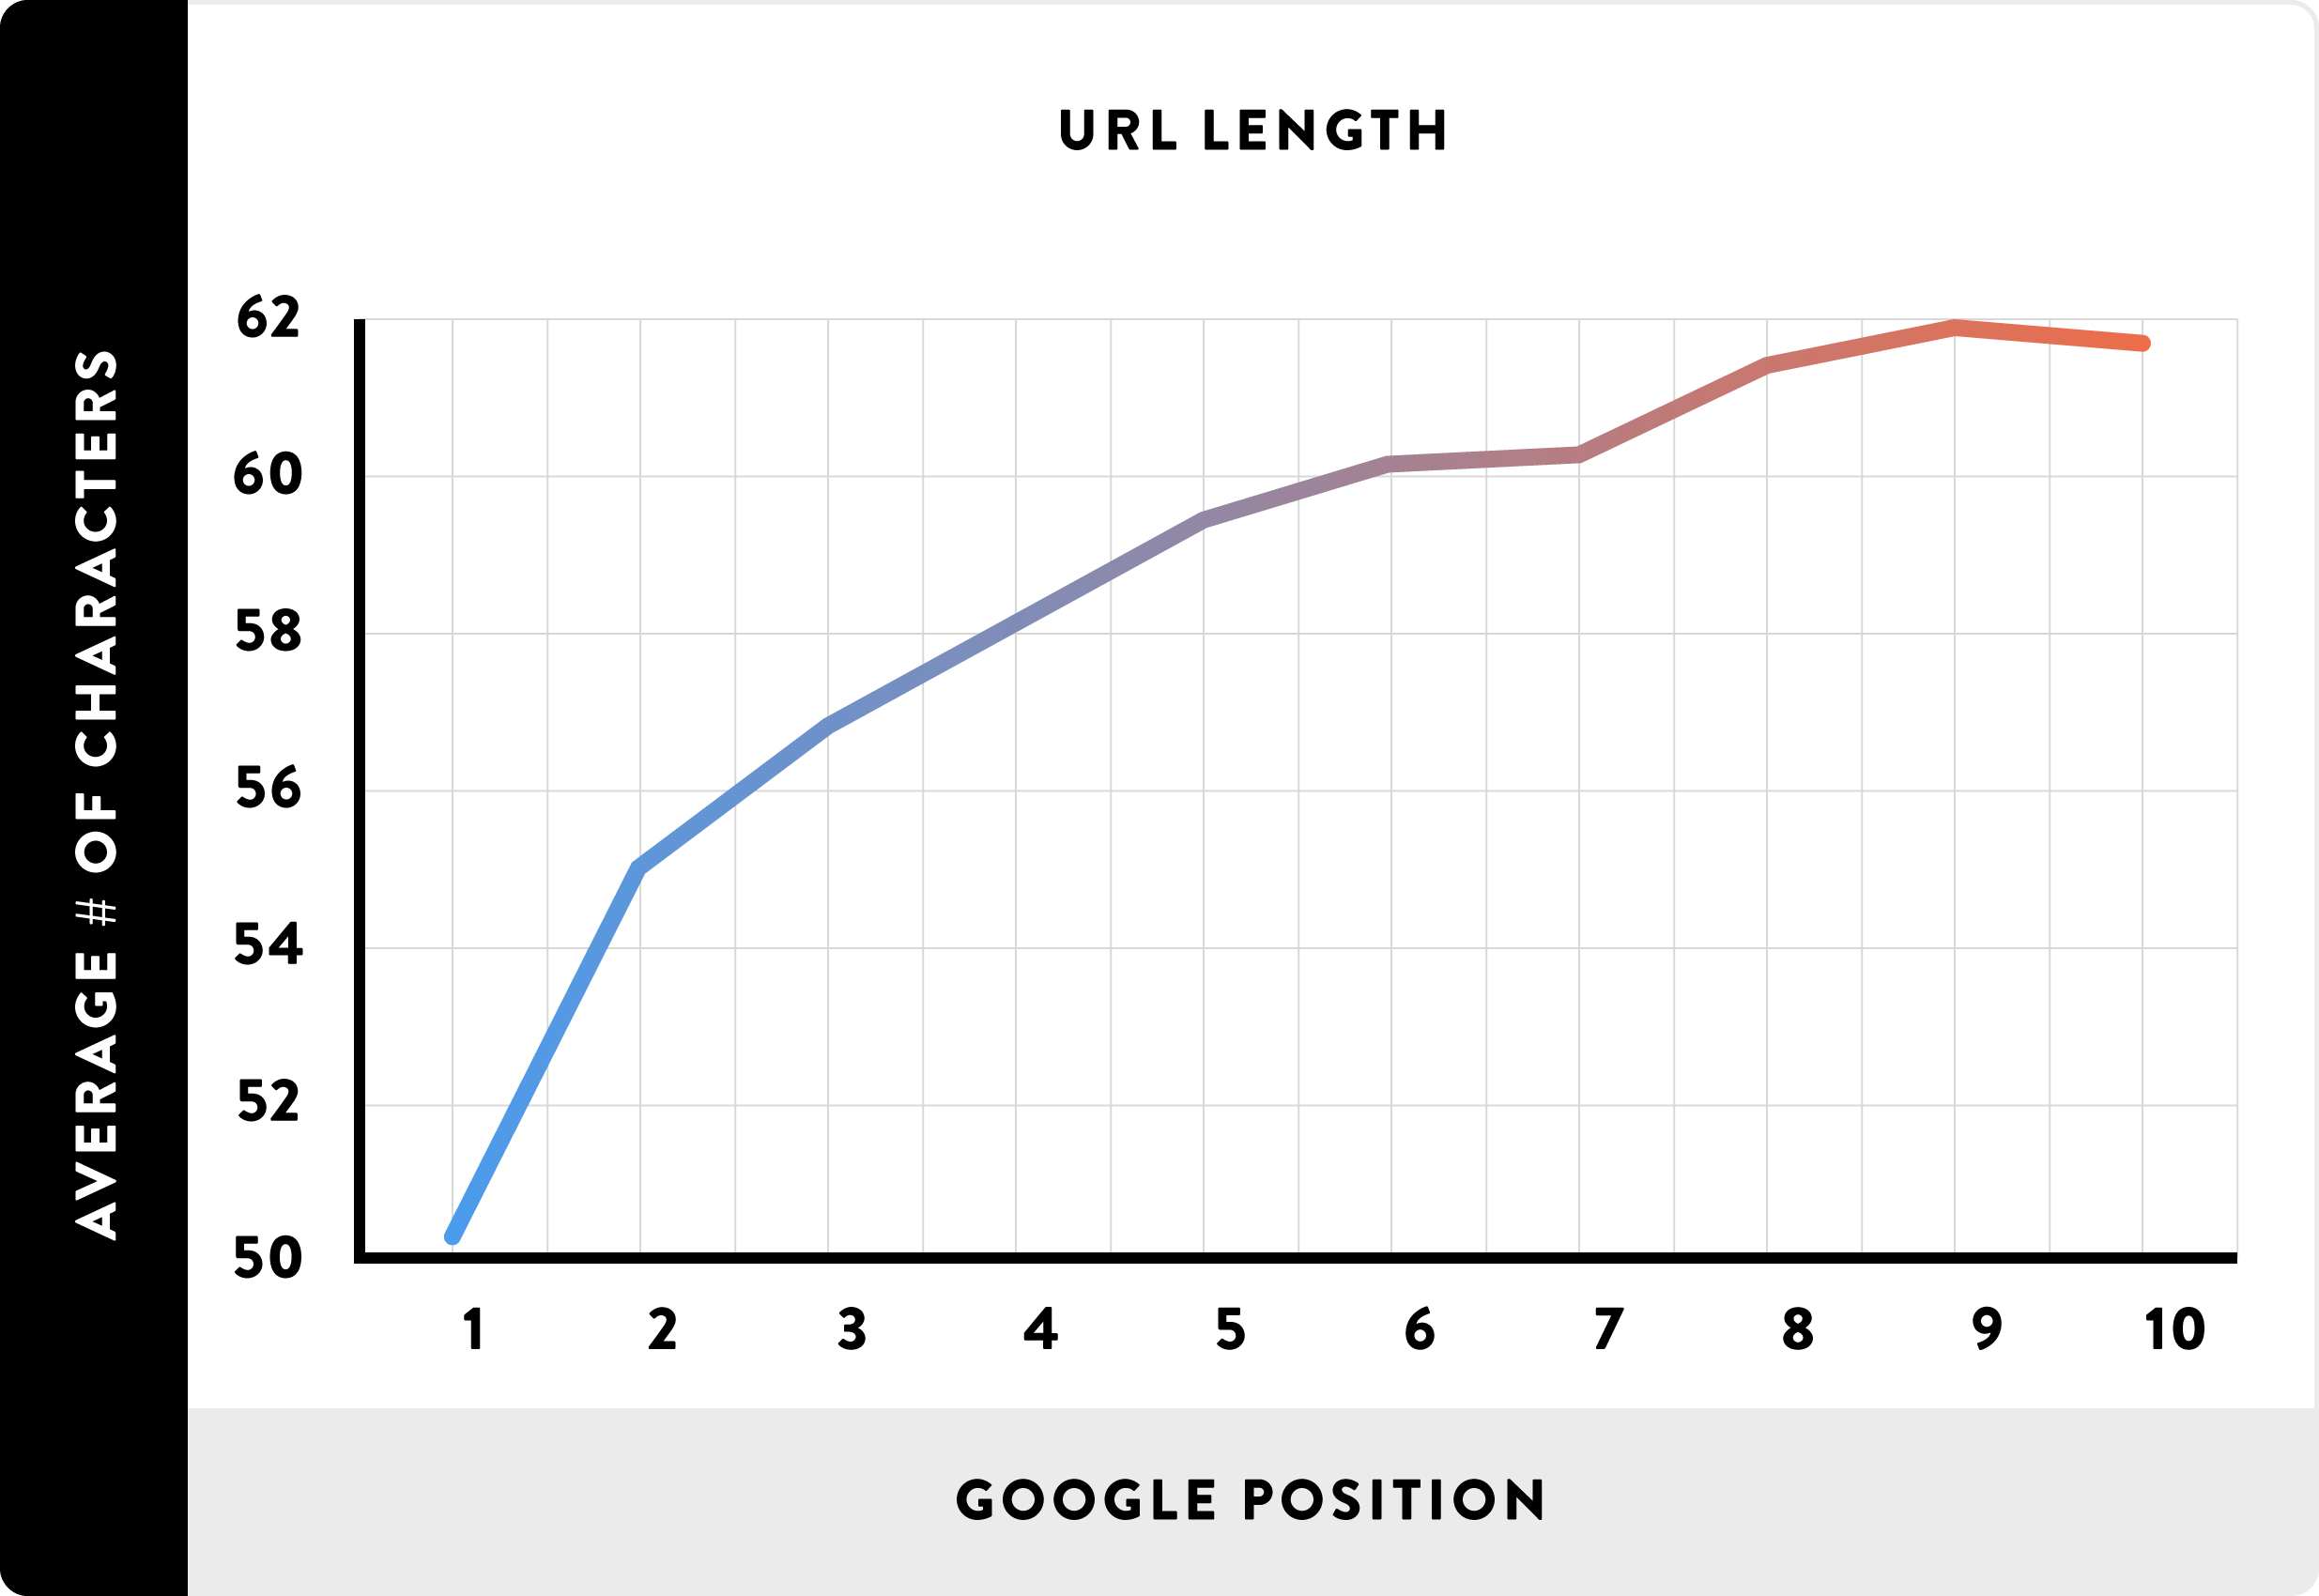
For instance, if you are writing a blog post about summer fashion for women, your URL string could be:
www.yoursite.com/womens-summer-fashion-tips
Keeping it simple and including a keyword will help you build relevance and increase your organic clicks.
Use a tool like the Keyword Density Checker to ensure that your content is properly optimized before hitting publish.
Step 5: Link Building on Shopify
Now that you’ve optimized your site structure, product pages, and blog, it’s time to build links.
Link building is just as important as content, according to Google.
Link building to your Shopify store will help you drive relevant traffic and build your domain authority by driving good signals from other high authority sites.
Shopify Merchant Emazing Group cited backlinks as being critical to generating traffic and sales, switching to Shopify to better manage links and URL strings, increasing revenue by 227%.
For Shopify specifically, link building will revolve around your products and your blog. The more blog content you create, the easier it will be to get links in your space, as sites will refer to you for content.
Here are a few ways to get links to your store!
1. Get Reviews From Bloggers In Your Niche
If you were to get a link on a popular review site like CNET, you would likely drive tons of traffic.
Why? People are clicking the links to explore products and will visit your site to learn more about your brand’s product.
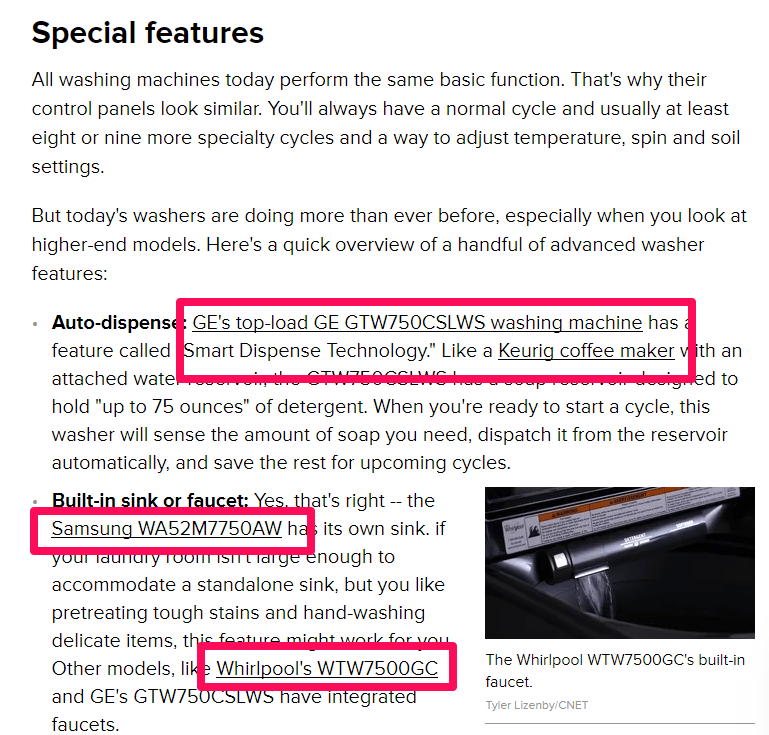
In their comparison posts, CNET links to each product they talk about. And if those products drive interest from a visitor, you can bet that they will be clicking on it to learn more.
Note that in this example, the products belong to major brands and are directed to GE, Samsung, or Whirlpool’s product pages.
This is to show that your own brand and products can be similarly linked to within a review article.
The best way to get linked to in a review article like this is to seek out websites with a nice domain authority that are already reviewing products in your industry.
Then you can reach out and suggest they review your product in a new article or add a review of it to an existing article.
Your chances of being successful at this could be improved by offering a sample of your product to the reviewer in exchange for an honest review on their part.
2. Guest Post On Authority Sites
You can also offer to write a guest post on a topic that would be interesting for a website to post on their blog.
If they accept, include one or two links to a product, blog post, or homepage in your Shopify store where it’s natural to do so in the text.
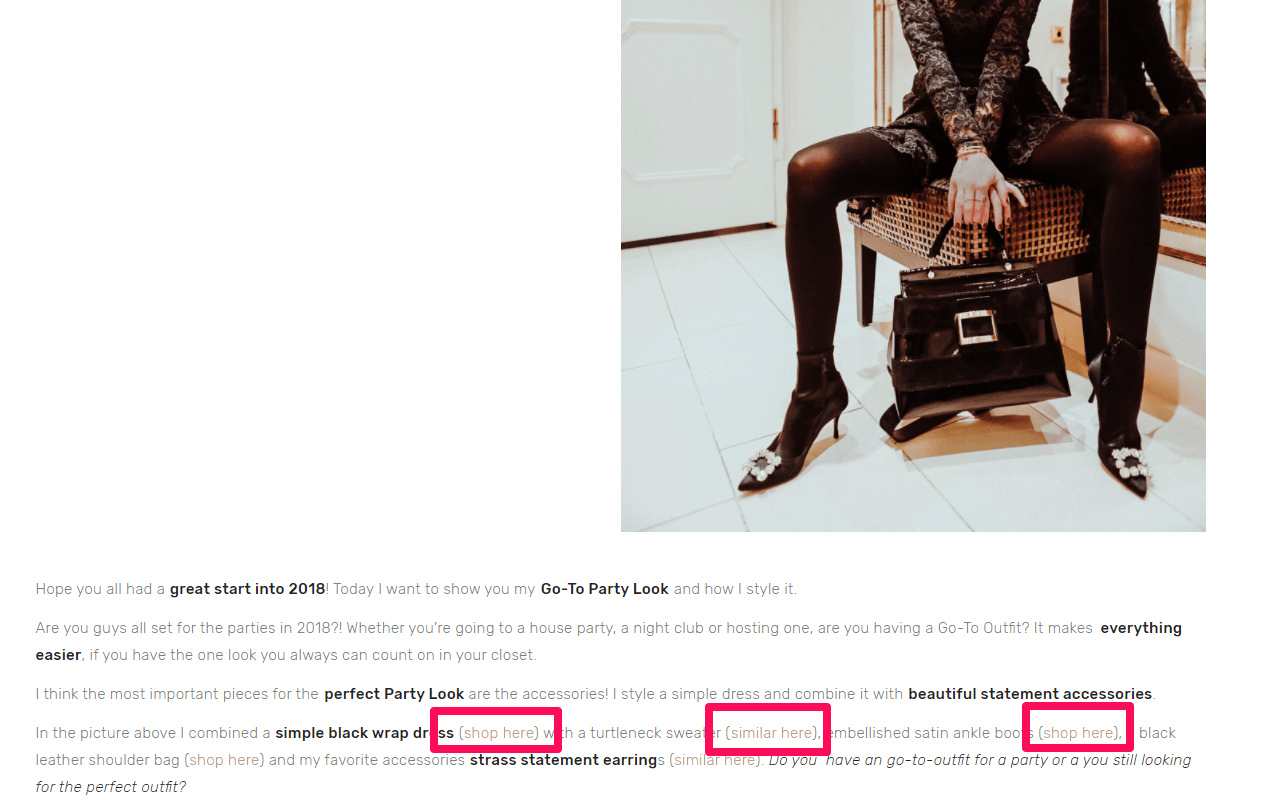
Let’s say you sell women’s apparel, for instance. Famous fashion blogger Caro Daur reviews women’s fashion on her website where she links back to specific products that she uses and gets sent by other companies.
Using a basic Google parameter for your search, like…
top [industry] bloggers
…can help you return large lists of the most popular bloggers and review sites in your industry/niche:

In every industry, there will be blogs talking about your space, products, and tips. You can leverage these sites to get backlinks to both your blog and products.
For instance, if a site is talking about tennis, you can use cold outreach to pitch products that they can talk about or link back to for users, or even drive them to an affiliate program where they can make money from linking to your products.
With a few tricks, you can easily find anyone’s email, making cold outreach a breeze. For example, using a tool like Voila Norbert or direct LinkedIn plugins like ContactOut:
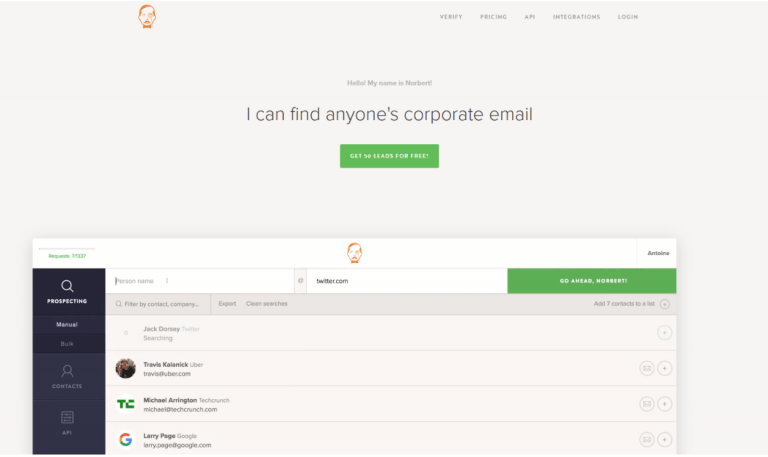
You can then take those emails and start a new cold outreach campaign, offering to send your products to them for no charge or asking for reviews.
Targeting blogs in your space will help you develop great product-specific backlinks that will boost your Shopify SEO.
3. Start an affiliate program
Another great way to build links on Shopify is to establish an affiliate program where others can link to your products and services, driving traffic and sales for a minor portion of your sale profit.
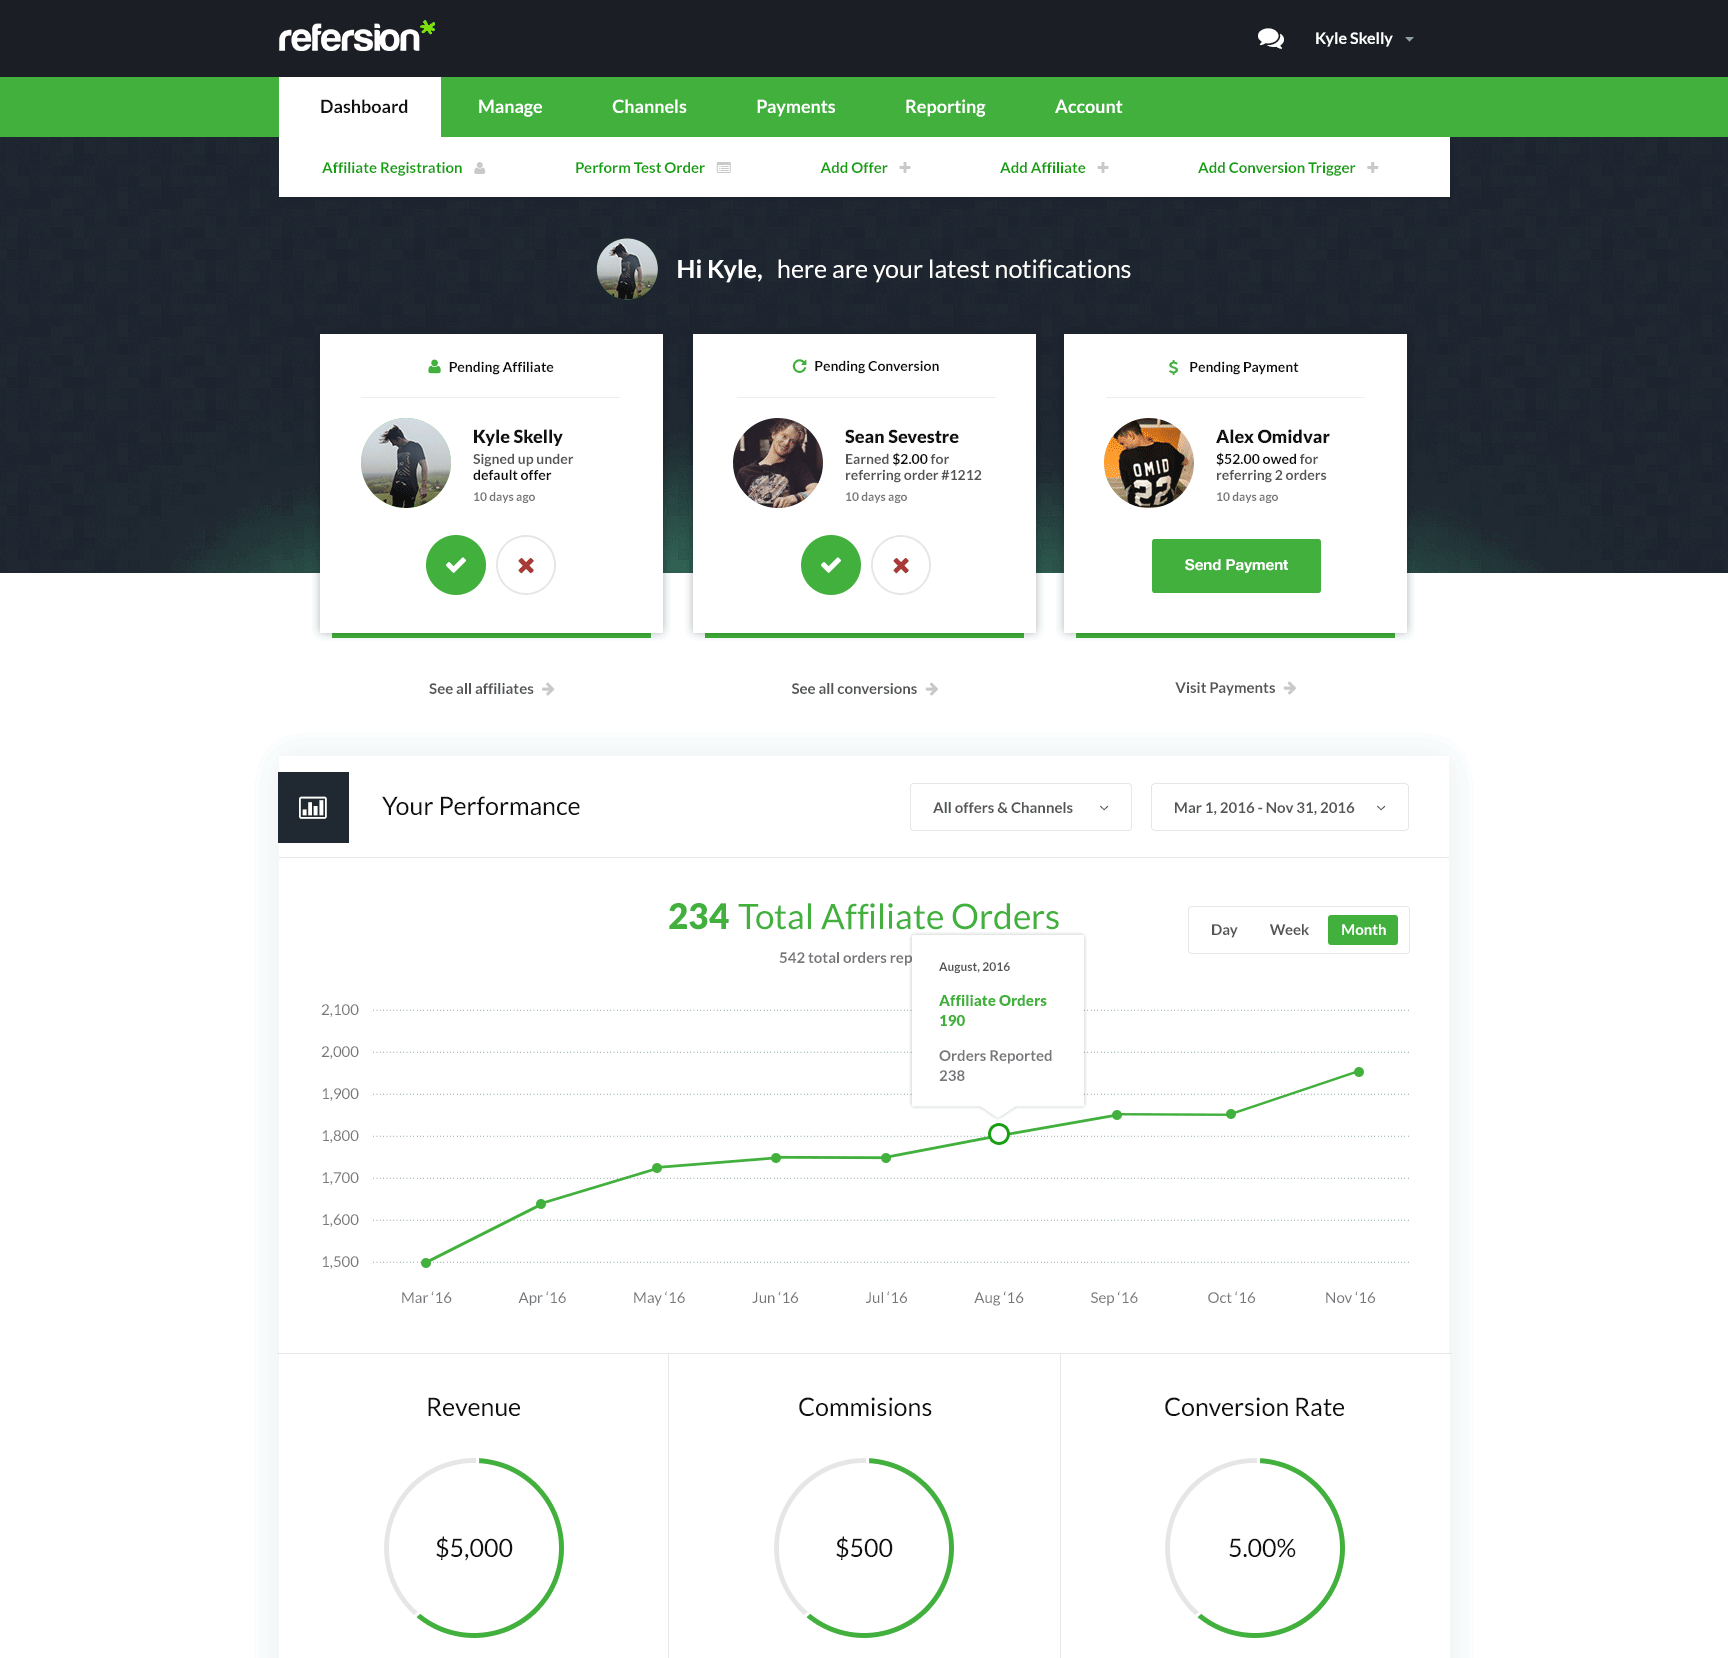
With a Shopify integration like Refersion, you can keep track of all of your Shopify store affiliates.
You can approve or disapprove people who apply, selecting only the users who have popular websites that can help you easily build direct product backlinks!
Optimize Your SEO Web Page to Rank Higher
Performing technical SEO for optimizing your Shopify store will help you drive tons of organic traffic that you can turn into sales.
By focusing on your site structure and user flow, you can create a seamless, wonderful experience for new users who land on your site.
A great website experience combined with great products for sale: that is what will help convert visitors to your Shopify store.
Staying up to date with Google algorithm changes can be challenging for Shopify site managers. Schedule a call with us to better learn how to optimize your Shopify SEO.
Leave a comment